Now that we have 100gb of quota in Exchange Online, if you have archived email, we encourage you to import them to your live email.
What are the advantages?
- Emails are reliable and more secure
- Emails are more accessible from every device or browser
NOTE: Depending on the size of the archive file(s) this could take some time to import.
The procedure for Outlook for Windows is documented below. If you use a different email client or need assistance with this process and have archives to import, you can submit a Support Request for assistance.
1st - Remove archives from Outlook account:
NOTE: If you have archives setup on multiple machines these steps should be done on all machines before proceeding to import.
- In Outlook click on File - Account Settings - Account Settings
- Click on Data Files tab
- Click on archive file - click on Remove (note this does not delete the file)
- Complete the above steps for each archive file
2nd - Importing archives to Exchange Online
- Decide if you want to import into your current Inbox - integrating archive with current emails, subfolders and creating new subfolders if they do not already exist
OR
if you want to create a new folder in your current email database to import into to keep Archive info designated separately.- If you want to create a new folder under your Inbox,
- Right click on the Inbox and choose New Folder.
- Type the Name for the folder, i.e. Archive2018
- If you choose to create a New folder outside the inbox,
- Right click on your RPI email address from the top of the navigation bar on the left and then choose New Folder…
- If you want to create a new folder under your Inbox,
- In Outlook, click File
- Click Open & Export
- Click Import/Export. This starts the Import/Export wizard.
- Click Import from another program or file and then click Next.
- Click Outlook Data File (.pst) and then click Next
- In the box for File to import click Browse and then select the Archive(.pst file) you want to import. (Not always, but these are commonly stored on your U: drive)

- Choose Replace duplicates with items imported and then click Next.
- To import the whole archive, click the top folder and make sure Include subfolders is checked
- IF you want to import into a new folder such as Archive2018 and this folder was highlighted from Step1 - Check Import items into the current folder - click Finish
- Otherwise click Import items into the same folder in: rcsuserid@rpi.edu
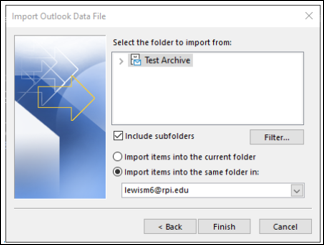
- Click Finish.
The emails will take some time to populate but once initially populated, access to them is more reliable. Also, if your archive files were stored on your U: drive, being connected to the RPI network just to access them will no longer be necessary.
Software applications used:
Microsoft Outlook
What online articles are available?
Importing Exchange archives into Exchange Online – Outlook for Windows